
UI Builder: Create a reference qualifier data resource for use on component
For non public pages, see: this article
Create your own transform data resource.
- On the Data resource tab, click the add button.
- Select Global, and click New.
- Select Transform.
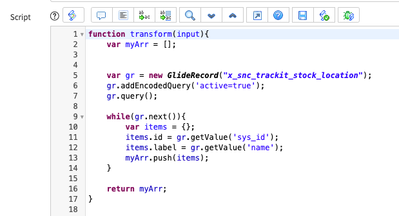
You will need to build an object with ‘id’ and ‘label’ properties.
- Create a script similar to the below example
- Be sure to place the object in an array and return the array in your function

- Navigate to ACLs. (you will need security_admin role for the next step)
- Elevate to security admin and create a new ACL.
- Type: ux_data_broker
- Operation: execute
- Name: the sys id of your data resource
- Roles: public
(click the arrow next to the Name field if it doesn’t change from the dropdown)

Save the ACL.
Bind the output to your dropdown component.
- In the config pane of the dropdown component, bind your output to the ‘items’ field.
- @Data.your_date_resource_name.output

Follow the above steps to create a new transform data resource
- In the properties field, enter a property to allow you to pass in input.
[
{
"name": "records",
"label": "Enter a Sys Id",
"fieldType":"string",
"readOnly":false
}
]
In the script, you will call your input, which will be the name of the input property. In my example, ‘records’ is my input name. You will create a gliderecord to lookup the dependent values from your parent value, which comes from your input property.

Save the data resource and create an ACL.
- Navigate to ACLs. (you will need security_admin role for the next step)
- Elevate to security admin and create a new ACL.
- Type: ux_data_broker
- Operation: execute
- Name: the sys id of your data resource
- Roles: public
(click the arrow next to the Name field if it doesn’t change from the dropdown)

Save the ACL.
In UI Builder, add your data resource to your page.
- On the data resources tab, click the add button.
- Find and select your application scope in the lefthand pane.
- In the middle pane, you will see your new data resource under the Transform section.
- Select it and click add in the right hand pane.
- You will not see any output at this point.
- Create a client state parameter to hold the ‘parent’ you will use to find the children options.

- Back in your new reference qualifier data resource, bind your client state parameter to the input field you created.

Now you need to update your client state parameter when an item is selected in the first dropdown.
- Click your dropdown ‘parent’ component.
- Select the Events pane.
- Select the ‘Dropdown selected items set’ event.
- Click Add a new event handler
- Select ‘Update client state parameter’ under Page-level event handlers
- In Client state parameter name, enter your client state parameter name.
- In the New Value, data bind the payload value.
- Click apply.

- Bind the output of your reference qualifier data resource to your 2nd dropdown component.

Now your 2nd dropdown will be dependent on the first dropdown value.
Labels:

https://www.servicenow.com/community/developer-articles/ui-builder-create-a-reference-qualifier-data-resource-for-use-on/ta-p/2577059